
Migrating a website to another website, for example, Shopify or WordPress is a common practice for e-commerce website owners.
Migrating a website to another website, for example, Shopify or WordPress is a common practice for e-commerce website owners.
If you found this tutorial you probably outgrew your current e-commerce platform provider and want to upgrade to a more scalable or standardized solution. While migrating can be seen as a good problem to have, it’s not without its share of issues and concerns. In order to choose the best platform for your website, you need to evaluate their strengths and weaknesses. Will the features and capabilities of your provider help your site grow, develop and build upon your success? Will you receive adequate customer service and support from the solution? Do you also need to upgrade your hosting provider, or will an all-in-one platform better fit your needs? Once you’ve decided on a solution, the problem is that migrating from one platform to another can be problematic, especially if you’re using a custom-coded platform or many different plugins.
For such websites, the best option would be to scrape the data using Hexomatic.
In this tutorial, we will cover different strategies you can use to move your products from one e-commerce website to another if they don’t support CSV exporting.
How to scrape eCommerce product data using the Hexomatic sitemap extractor
You can proceed this way in case you have a product sitemap in XML format.
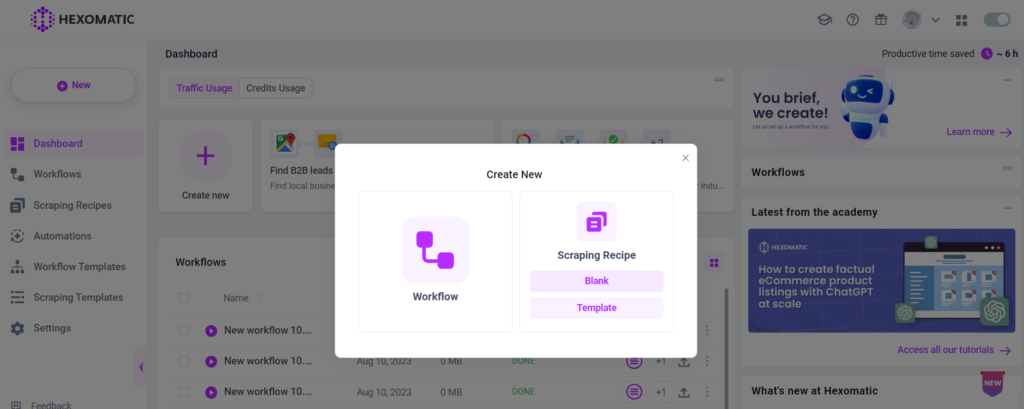
Step 1: Create a new workflow
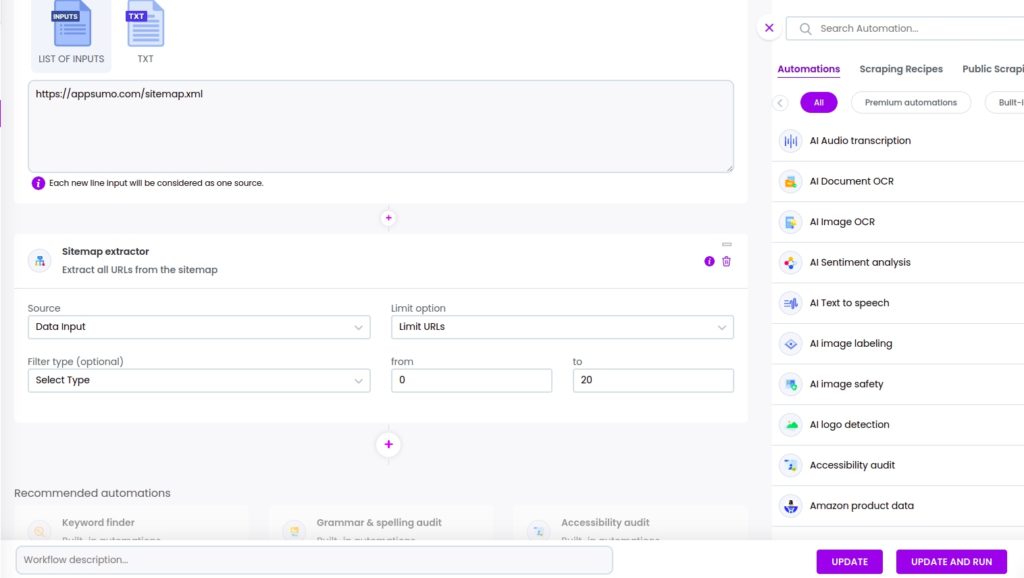
Create a new blank workflow and choose the Data input automation as your starting point. Add the sitemap URL using the manual paste/ list of inputs option.
Woocommerce product sitemaps typically look like: yourdomain/product-sitemap.xml
Shopify product sitemaps typically look like yourdomain/sitemap_products_1.xml
You can typically find all your sitemaps by visiting yourdomain/sitemap.xml


Step 2: Add the XML sitemap extractor automation
Next, add the XML sitemap extractor automation, selecting data input as the source.
After filling in all the required fields, click Continue.
Step 3: Run or schedule the workflow
Now you can run the workflow to get the results.

Step 4: View and save the results
After viewing the results you can export them to CSV or Google sheets. In this case, we recommend saving the results to a CSV file, then removing all the non-product pages.
After, you can use data input automation + scraping recipe to extract all the product data.
How to scrape eCommerce product listings using the crawler automation
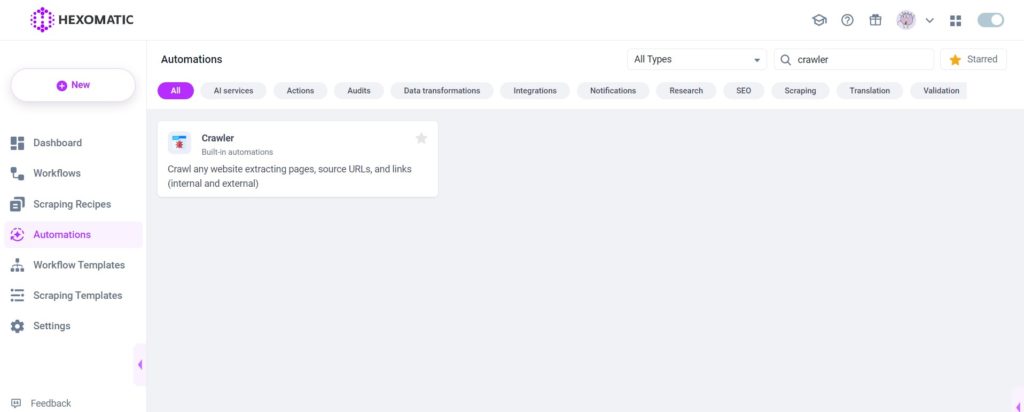
In cases, when you don’t have the website sitemap, you can use our Hexomatic crawler automation to get both internal and external page URLs.
Step 1: Create a new workflow
Create a new workflow from automation and find the Crawler automation from the automations list.
Step 2: Add the crawler automation
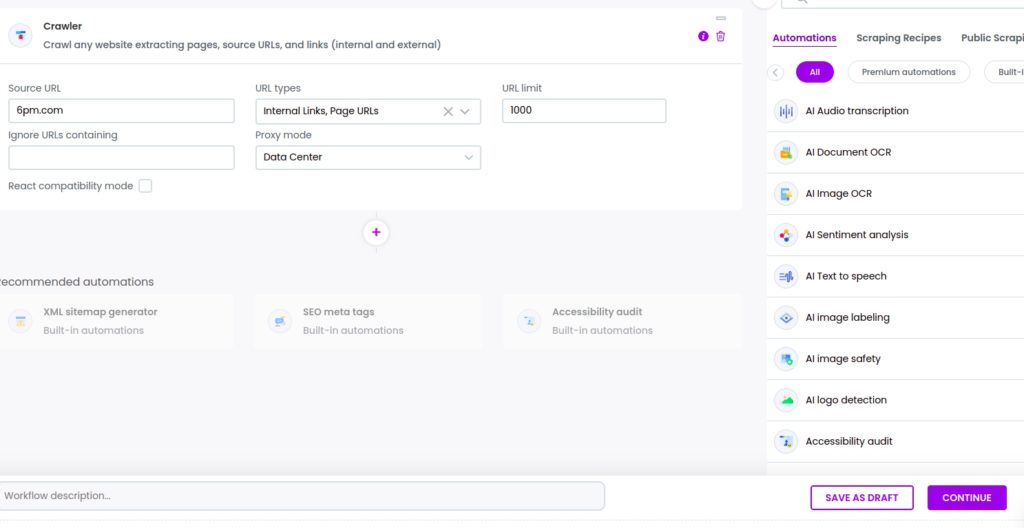
Now, add the crawler automation, adding the website URL to crawl. You can also specify the URL types, set the URL limit, and choose your Proxy mode.
You can use the “Ignore URLs containing” option to filter out pages to exclude your product pages.
After filling in all the required fields, click Continue.
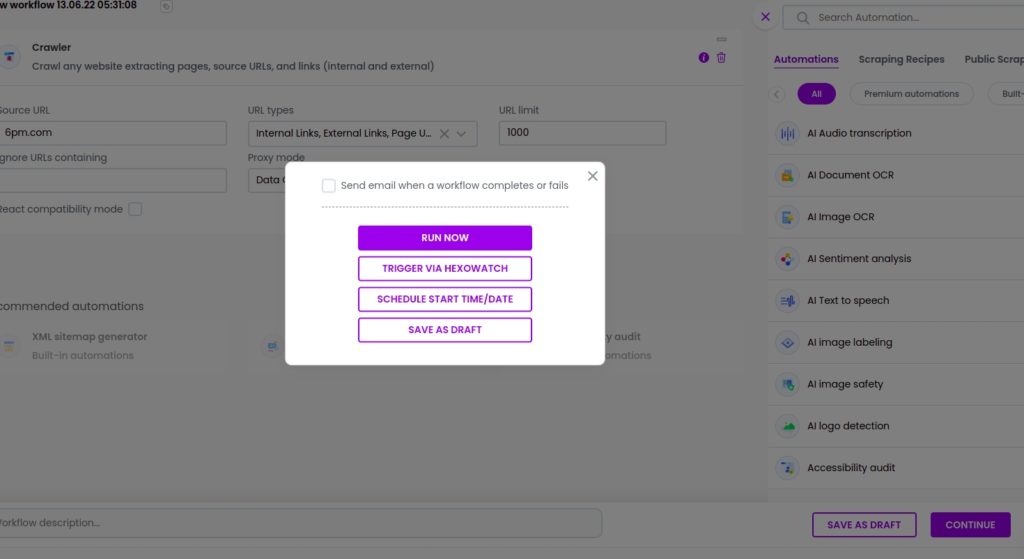
Step 3: Run or schedule the workflow
You can run the workflow or schedule it.
How scrape eCommerce product listings via a two-step scraping recipe
In this section, we will show you how to scrape eCommerce product listings using the two-step scraping method.
In essence, you will create one scraping recipe to capture the product page URLs.
Then another scraping recipe to capture the product page fields.
Then you will combine both scraping recipes inside a workflow to capture all products and their product page details.
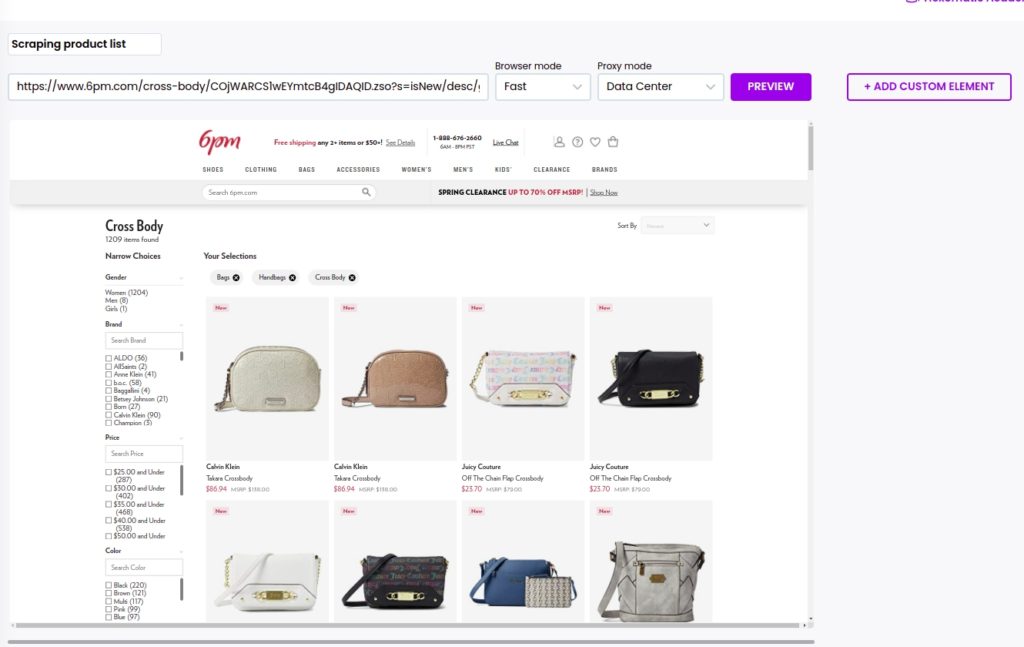
Step 1: Create a new scraping recipe to capture all the product URLs
To get started, create a new blank scraping recipe.
Step 2: Add the URL of the category you want to scrape.
Next, add the URL of the category page listing all the products you want to scrape and click Preview.
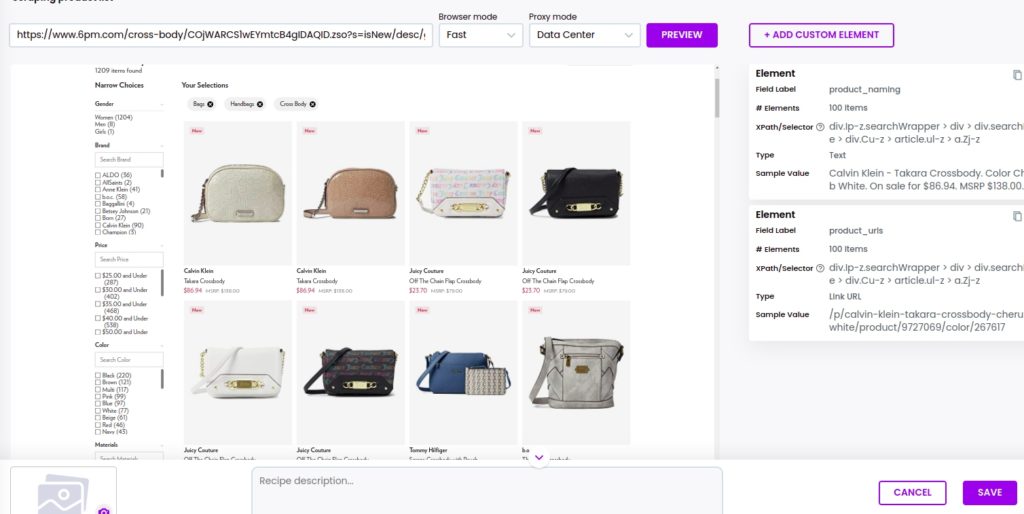
Step 3: Choose the elements to scrape
Now, choose which elements you want to scrape. Select to scrape the title of the product, selecting text as the type and the product URL, selecting link URL as the type. (You can also scrape pricing, images, and more but here we just need the URLs of the products).
After selecting the necessary elements, click Save.
Step 4: Scrape product pages
Now, you need to create another scraping recipe to scrape the product detail pages.
To do this, add the URL of one of the products then, click Preview.
Next, select all the fields you want to capture, for example, the product title, short description, main description, images, ratings, etc.
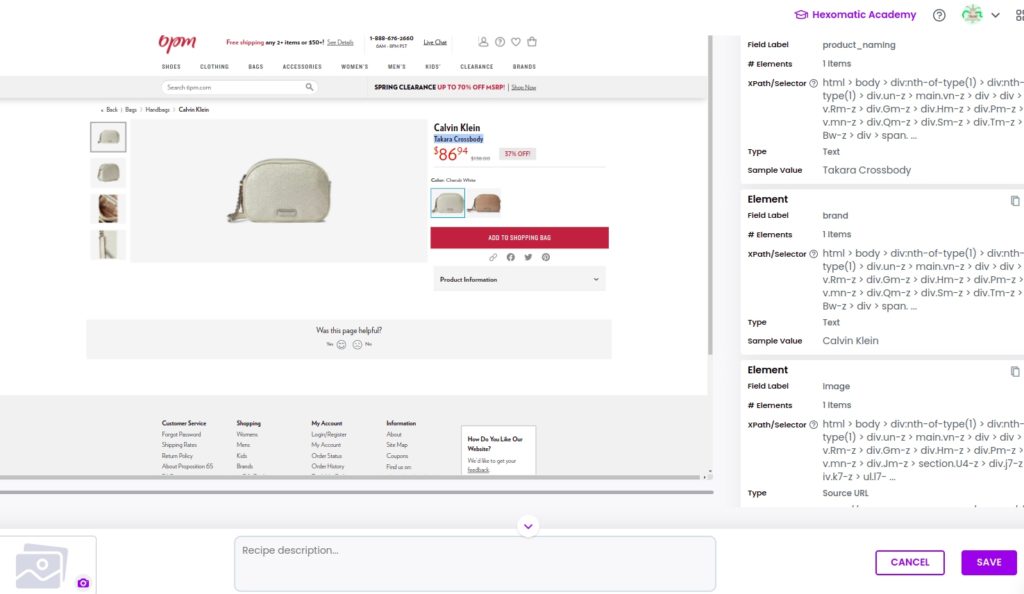
After selecting all the necessary elements, click Save.
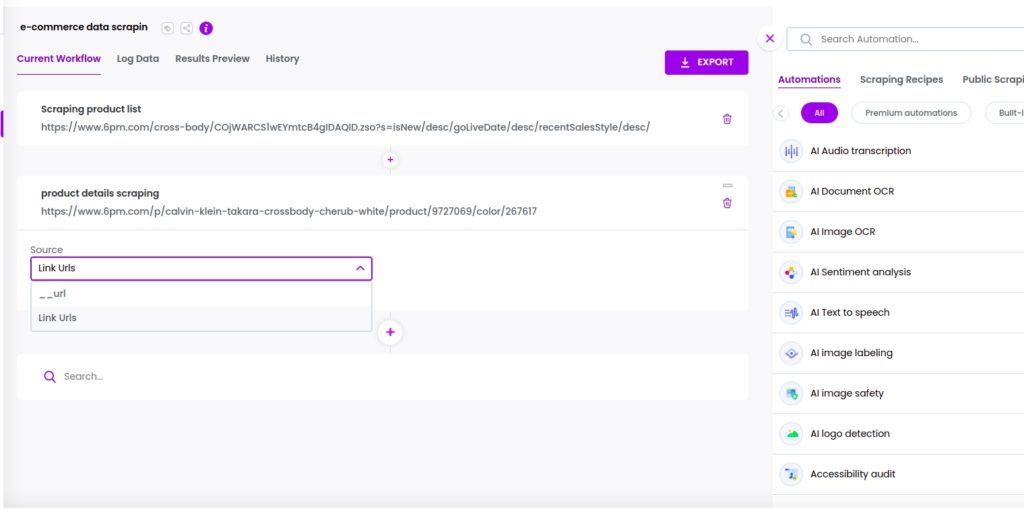
Step 5: Create a new workflow to run both scraping recipes
Create a new blank workflow.
Step 6: Add your scraping recipes
First, add the first scraping recipe (that scrapes all the product URLs), then the recipe for capturing data from each product page, selecting Link URLs as the source. Then, click Continue.
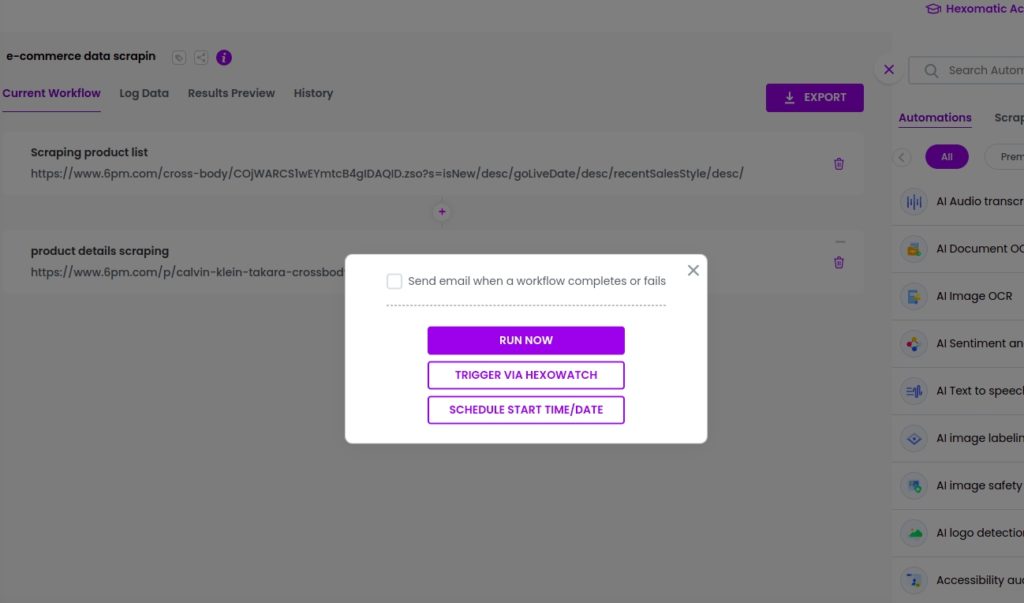
Step 7: Run or schedule the workflow
Finally, you can run your workflow to get the scraped data.
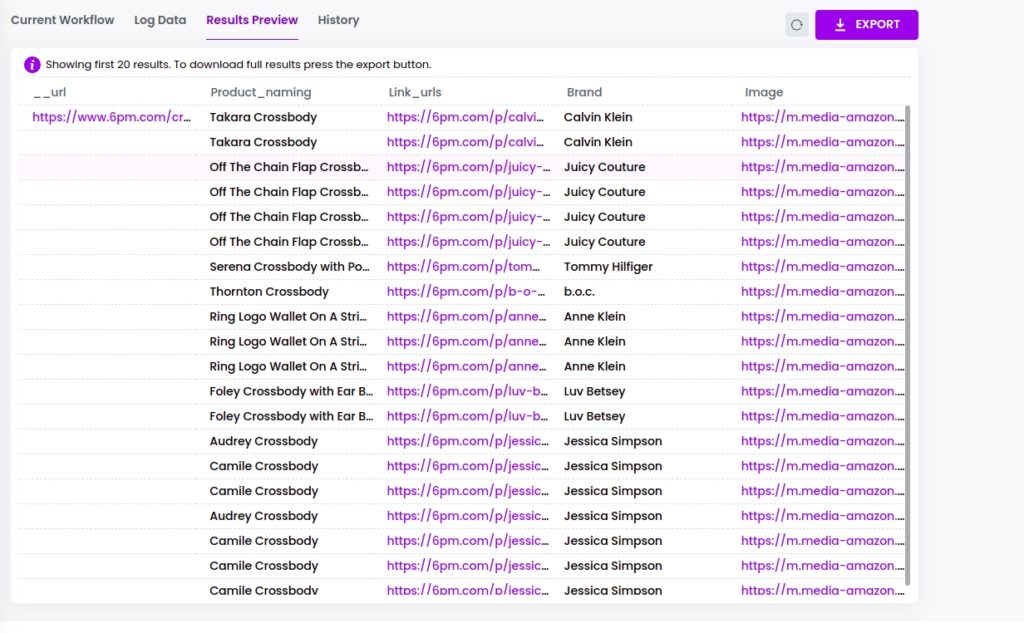
Step 8: View and save the results
After viewing the results, you can export them to CSV or Google sheets.
How to migrate your products to Shopify using a CSV export
In this section, we are going to show you how to migrate your products to Shopify with CSV export.
When updating products, note to save two copies of your CSV.
One copy serves as a backup.
Note that your CSV should match the Shopify CSV file format.
Step 1: Go to the products page
Go to the products page in Shopify and click Import.
Step 2: Choose a file
Next, you need to choose the file.
In your file directory, locate your CSV file and click Open.
Each product should have a product handle and a product title in your CSV file.
Then, click Upload file.
Shopify will show you a preview of your first product.
Step 3: Start Import
After checking if everything is correct with the uploaded file, click start import.
Once your CSV file is uploaded, you will get a confirmation email from Shopify.
How to migrate your products to Woocommerce using a CSV export
In the final section of this tutorial, we are going to show you the basic process of how to migrate your products to Woocommerce using a CSV file export.
Step 1: Start an import
Start a new import using WP ALL import by uploading a file, downloading a file, or using an existing file.
You can choose the option which is most suitable for you.
When the import file is available, specify which data you want ] to import. In this case, WooCommerce products should be chosen. Then, click continue.
Step 2: Preview the file
You have the option of previewing the file with different nodes and rolls.
After previewing, click Continue.
Step 3: Map product elements
Now you have the option to drag and drop elements from the right to the correct WooCommerce field on the left (for instance, name to the Title field, and description to the description field).
Once the mapping is completed, you can click Continue.
Step 4: Set a unique identifier
Now, you need to set a unique identifier for your products.
You have the option of selecting the Auto-detect button so that the plugin itself will set unique identifiers for your products.
After setting the identifier, click Continue.
Then, you need to proceed by clicking Confirm and Run Import button.
Step 5: Complete the import
Once your import is completed, a message will appear, informing you about the number of products imported from the file.
Please, note that while importing variable products using WP All Import, you need to consider different aspects. For example, In the drag and drop interface, specifying the attributes and their values will be necessary. Additionally, you need to set the relationship between the parent product and the individual variations.
Automate & scale time-consuming tasks like never before

Marketing Specialist | Content Writer
Experienced in SaaS content writing, helps customers to automate time-consuming tasks and solve complex scraping cases with step-by-step tutorials and in depth-articles.
Follow me on Linkedin for more SaaS content